skip to main |
skip to sidebar
As a person trying to walk a more respectful path with nature,
sometimes I do great - and sometimes I fail miserably. I think our whole life is just one big learning process that we never quite complete- and honestly, would you really *want* to get everything right, all the time? So I compost, I recycle, I line-dry my clothes when the temperature is above freezing, and utilize a rain barrel. Diapering my kiddos - I would LOVE to exclusively cloth diaper. However I work 30 hours a week and the Mister will not mess with cloth diapers. So I do what I can - I cloth diaper as much as I can, and yes, we also use the dreaded disposables.
To balance the things that we throw away, I try and re-purpose and upcycle. Not only does it save us money, but we minimize how much crap gets dumped in a landfill. Some things are no brainers, others have been results of making do in a pinch:
Stained or ruined clothing gets re-purposed into rags for cleaning. Also, strips of cast-off t shirts make durable, free garden ties.
Stale bread gets crumbled up and added to bird feeders.
Twist ties and tab ties from bread bags make good garden ties as well - and the twist ties can also be used for crafts.
Mooch has gotten very into up-cycling from our recycling container. From our tree topper to an empty huge vinegar jug that she's planning on making into a bird house. Save yourself a trip to the craft store and always scout around for things that can be re-purposed.
When we rake up our leaves in the fall, we rake them straight into our gardens. Free mulch! If we have too many we add them to the compost bin, and if we have tons we bag them up and store them under our deck to be gradually added to the compost bin to balance our kitchen scraps and grass clipping additions.
Fallen branches in your yard - obviously these can be kindling for your fireplace, but they also make great stakes for the garden. My parents have these gorgeous mountain laurel bushes on their property, and I grabbed some fallen branches to make a pretty holiday planter. Arrange branches in a planter filled about halfway with dirt, anchor with some medium sized rocks. Wrap strings of lights around the branches for a pretty, low-cost addition to your entryway.
Egg cartons make great starters for seed. Fill with potting soil, drop a seed in each one, and place in a sunny window.
The gourds that use for decorating in the fall can be dried and used for everything from bird houses to instruments (drill a hole in the bottom, fill with beads, bells, or seeds; plug the whole back up)
A few summers ago a friend came over with one of those giant buckets of pre-made margaritas. The next day while nursing a sore head I noticed the girls' crayon bin was overflowing. Eying the empty margarita bucket (gag) I scrubbed it out and dumped the crayons in there. We later fancied it up (and covered the Jose Cuervo label) by covering it with construction paper that the girls then painted on.
Though I sometimes drive the Mister crazy with this ("I can use that again! Don't throw it away!" is my mantra) it makes me happy that when we haul our trash can out to the curb, it's usually only half-full. Some weeks we get away with skipping with putting it out, altogether.
We are actually sending out our holiday cards today (wooh-hooo!!) and then I just have to knuckle down and get crafting for everyone's presents. Luckily the Goodwill gods have been smiling on me and I've found a whole bunch of treasures. I'm also going to ask the Mister about burning a Yule log this year, and although it always strikes me as disgustingly funny, I may attempt a Yule log cake. Be well!
*Resisting ball jokes*
I popped some popcorn for the girls the other day as a snack, and of course we ended up with the majority of the bag left over. I also have a jar at the back of our fridge that I add fat to (from bacon, roasts, burgers, etc), so I started thinking about mixing up some suet balls for the birds. Butterbean was napping so Mooch and I made these up - she loved making them but kept complaining "They smell AWFUL, Mama!" :-)
In a medium saucepan melt the fat over medium low heat. If you're not into keeping fat in your fridge or your a vegetarian, you can substitute Crisco. Add peanut butter and a good sprinkle of corn meal.
Mooch was very into stirring!
The great part about these is you can use a variety of starchy things to bind these together. We used a hunk of stale pumpernickel bread shredded into little pieces, the leftover popcorn, some bird seed the birds aren't too crazy about (it's the cheapo supermarket crap), and some raisins. You could also use dried apples, nuts, or oatmeal.
Pour the fat/peanut butter mixture over your dry ingredients and mix
Cut some square pieces of wax paper or parchment paper, and scoop about a cup of the mixture in the middle of each one. Then pull the edges of the wax paper up and twist so the suet forms a ball at the bottom. Secure the twist with leftover twist ties, string, or clothes pins.
Place them in the freezer until firm. Then tie a piece of string around it and hang it up for the birds to enjoy. A great way to take care of the birds, reduce waste, and have a little craft/bonding time with your own ankle biters!
We got our tree last week! We went with a live tree this year, which we will plant in my Mom & Dad's forest whenever the ground thaws. I'm considering moving it in it's planter into our backyard after the holidays, to give the birdies a little refuge. I'm sure the Mister will just love moving this sucker ... he almost broke his back trying to get it inside! Word to the wise - if you go with a live tree, they weigh a ton!
Mooch posing. She's obsessed with these fake Poinsettias I used one year to do a theme tree ... LOL
Butterbean inspecting ...
These are some mice ornaments that Mooch and I made last year. We strung wire through some giant poof balls we got from the Dollar Store, glued on pinecone scales and buttons for ears and pine needles for whiskers, then added mini poof balls for noses and a curled pipe cleaner for a tail.
Another home crafted ornament, inspired by a Martha Stewart idea - button animals! I bought a jar of buttons at a thrift store for 50 cents, and we made these little reindeer and some snow men with them. Also pictured is the beautiful handmade ornament my sister made me last year.
I *hate* that this won't store well, because I love it! Mooch wanted to make a tree topper, and she is very into up-cycling (wonder where she gets that from?). She pulled an empty toilet paper roll out of the recycling and we covered it in scraps of felt from other projects. Then we lined the inside with glue and stuck in some dried leaves, sweet gum balls, and these pod-things we found on a walk. It looks like a very abstract angel, and goes with our Mother Earth theme!
Hope you all are well and not stressing about all the holiday nonsense. Mooch reminded me the other day how simple it could be ... her Pop-pop asked her what she wanted for Christmas and she told him, "To come to your house and have a candlelight dinner with you in front of the fire". She's a Pop-pop's girl!
Well hey there!
Our little house has been a hive of activity lately. Between prepping for the holidays, the general cleaning and organizing, and keeping up with the ankle biters I feel like I haven't had time to cook enough for the fam, which I love to do. That's my "me" time - I light my candles, pour a glass of wine and kind of zone out.
The other night the fates aligned just right and by some miracle my husband was home, my kids had napped, and a meager amount of housework had been accomplished - so I had enough time to prepare this little feast.
I love butternut squash. When you peel it, it releases this amazing fresh and sweet smell. I may have to find a way to make a perfume with it ... hmmmm ....
Anyway, this is one of my absolute favorite soups. And I had been wanting to make rosemary foccacia for a while.
First I chopped up 1/2 of a good-sized onion, and added it to a stock pot with olive oil over medium heat. I crushed two cloves of garlic into it, then added my seeded, peeled, and chopped up butternut squash.
I let this cook until the onions and garlic were caramelized and the squash had softened slightly. Then I added 3 cups of chicken stock, salt, pepper, and nutmeg.
I brought this to a boil, then lowered the heat and simmered for about 10 mins, until I could easily mash the squash with the back of a spoon.
Then I transferred the whole thing to the food processor. Every recipe I had looked up for "bisque" called for a whole bunch of heavy cream in it. So in an attempt to un-Paula Deen this, I just added 2Tb of the Mister's half and half that he puts in his coffee. Yum! Creamy without guilt. Blend in the food processor or blender until smooth.
For the foccacia, I cut some beautiful stalks off my plant, rinsed and dried them, then chopped it up.
I dissolved a packet of yeast plus 1 tsp of sugar in 1/3 c warm water (aim for 120 degrees). Then added 2 cups of flour and 1 tsp olive oil. As I kneaded this together I added the rosemary,
then put it in a lightly oiled bowl and cover.
I had been heating my oven on low because are kitchen is super drafty, so I turned off the heat and placed the bowl inside so that it could rise. After an hour I took it out and punched it down, then divided the dough in half. I kind of pulled and stretched to form an oblong shape out of both and set them on a lightly oiled cookie sheet. At the advice of the BEST bread making blog ever (www.thekneadforbread.com) I also placed a pan on the bottom rack of the oven, then pre-heated the oven to 400 degrees. Right before I put the bread in I brushed the top lightly with oil, then sprinkled with sea salt and more rosemary. I brought a cup of water to boiling and carefully poured it into the pan in the oven, then put the cookie sheet on the rack above it.
The cretins in my house opted for grilled cheese to go with their bisque - but I LOVED this combination!
Also, you can use the stalks of rosemary that have been stripped of their leaves for amazing chicken. Use them like skewers and they infuse your chicken with rosemary flavor.
My dad is kind of a pyro. He is an expert fire builder, and my parent's house always has a fire going. In the summer we do bonfires in the fire pit he dug himself and lined with rock, and the amazing chiminea they rescued from a dump is being used more often than not.
He is also not the easiest person to shop for - he pretty much buys anything he likes, and he can be picky. He was the lone panic attack I experienced when trying to figure out what I could make for him. I literally googled "crafts for men" and one of the hits I got was for pinecone fire starters. Woot!
To start with, gather as many pinecones as you will need.
Also gather a double boiler, or a cheap saucepan that will fit over another saucepan, waxed wick or twine (I used hemp garden twine for mine), a disposable muffin tin (you will recycle it, right?) and any nubs of candles you can find around your house. I went to the super-cheapy secondhand store near my parent's house and walked away with a shoebox of candles for $2. You can also use certain chemicals to produce a colored flame - salt substitute will make a violet flame, Borax makes a yellowy-green flame, and Epsom salts make a white flame. There are other chemicals that will make more colors, but I stuck to these as they seemed the least likely to make me grow a third nipple.
Set up your muffin tins with a pinecone standing up in each one. Wind the wick so it settles in between the scales and close to the center. The website that I originally looked at suggested rolling the pinecones in glue before rolling them in the additives, but I said meh and just sprinkled the additives over the pinecones. It still worked. Now in your double-boiler melt the wax. I used an old paint stirrer to make sure it came out somewhat non-lumpy. I also did my colored wax in layers - I melted red first and drizzled it over the cones, then green over that - then did a few just solid colors. Get creative. It kind of felt like getting to be a big kid playing with things I wasn't supposed to. Then just leave them to set - about an hour or so. I got a big basket from Goodwill for $1, lined it with some funky paper, piled all the cones inside and tied it up with ribbon.
They kind of came out like this, though not nearly so professional-looking (still haven't put batteries in my camera)
Wait - actually that IS my basket. Yup. And that's my fireplace, with no dog hair or beheaded Barbies on it. And if the camera was turned slightly more to the left you would have seen my spotless living room as well. That's right bitches- be intimidated!
I'm going to get better about posting on a daily basis (do you hear that sound? It sounds like toddlers plotting to destroy a plan. You will not prevail, ankle-biters!) and I will attempt to provide you all with my take on the easiest, least expensive, and most useful holiday presents that you can make.
My mama started a rule two years ago that all Christmas presents exchanged between family members have to be either homemade or bought at a second hand store. LOVE THIS. It forces you to be creative, it is eco-friendly, and I think it makes every gift so much more meaningful. And do you really need 5 gift bags full of crap that you will probably just re-gift anyway?
The gifts these last few years have been some of my favorite things. My sister made me a gorgeous vase out of a cheap glass one she found at the Dollar Store, with reeds and shells from the beach in front of her house hot-glued on, and a matching candle holder. My other sister who is incredibly artistically talented made us all handmade felt ornaments with our initials stitched on,
that are so gorgeous I leave them up around the house all year long.
So if you would like to start a tradition like this, or even just incorporate more handmade, heartfelt goods in your gifts, this is a good place to start.
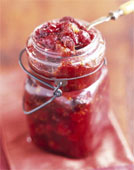
The Best Cranberry Chutney, Ever.
One year at Thanksgiving I got drafted by my mom to make cranberry sauce. Ugh - right??? The stuff in the can is always so much better. Imagine my surprise when this came out so stinkin' good I was eating spoonfuls of it right out of the pot. I experimented with a couple different recipes for sauce, then came across one for chutney - which is a little sweet and a little savory. It was so good I finally bit the bullet and taught myself how to can things so I could have some on hand all year - then reluctantly gave out a few to relatives for Christmas presents. Now I am officially the Chutney Lady - almost every holiday card I get has a scribble on the bottom asking for a jar :-/
So here's the loose sketch of how to make it. I never measure the spices, and it comes out a bit different every time, which is kind of cool. Pulling out a jar of this in the middle of summer and putting it alongside some grilled pork loin or chicken is heavenly.
Your ratio is going to be 1 cup of water : 1 cup of brown sugar : 2 cups of fresh cranberries. I made a huge batch of this last night and tripled it.
In a big saucepan heat the water with the brown sugar. When it comes to a boil, add the cranberries and when you hear them start popping lower the heat just a little. Add about 2 Tb of apple cider vinegar, a few good shakes of cinnamon, ginger, and ground cloves. Then take two clementines and zest the skin into the chutney. You will need to progressively turn down the heat to make sure the pan doesn't overflow. To mine I also add 1 very small shake of cayenne and a few grinds of black pepper. Keep stirring until the sauce gets thicker and has reduced, about 20 mins. If you wanted this to be a molded sauce (i.e. "Fancy Pants Chutney") cook it longer. Basically the longer you cook it the harder it sets. As soon as you turn the heat off pour it into whatever serving vessel you're using, or can it. Tie the jar with some raffia and a gift tag, receive praise for your culinary fabulous-ness, etc.
*Stock photo - my camera needs batteries*
I love, love, love Barbara Kingsolver. If you've never read Prodigal Summer, get up and go to the library and get it NOW. Poisonwood Bible will break your heart, High Tide In Tucson, Animal Dreams .. this woman has an incredible talent.
This book follows the life of Harrison Shepherd, starting with his childhood in Mexico where his mother has moved with her lover. The book opens with Harrison and his mother huddling in bed listening to the howler monkeys, which they fear are bloodthirsty demons. His mother whispers "write everything down, so when they find only our bones they know what happened to us."
And so starts his life as a writer. He writes through his tumultuous relationship with his mother, meeting and apprenticing himself to Diego Rivera (and subsequently befriending Frida Kahlo), and working for Leon Trotsky. The book is written mainly as a collection of letters, journal entries, and articles on Harrison himself and his friends.
After moving to the US as an adult and getting his first book published, Harrison finds himself a target of scrutiny for his ties to the Communist party. How he reacts to this witch hunt (pardon the term) is extraordinary.
It was so easy, reading this, to pity this man. I think Kingsolver demonstrates beautifully how the trials of our lives ready us for what lies ahead. You are ready to just sympathize with Harrison throughout, and at the end, he amazes you.
The lacuna refers to a portal Harrison finds as a boy while swimming - he notices an underwater tunnel, the only way of which to enter is by holding your breath and swimming as fast as you can. The tunnel leads to an oasis for a young curious boy. You hope all the way to end of this book that he reaches the other side.
And I give it:
(Out of 5)